


* 겪고 있는 문제 상황을 최대한 자세하게 작성해주세요.
* 문제 해결을 위해 어떤 시도를 해보았는지 구체적으로 함께 알려주세요.
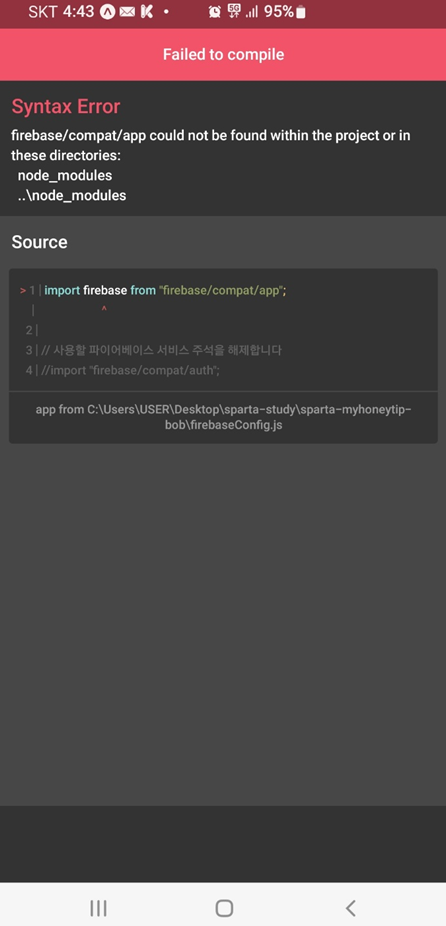
4-6 강의 MainPage 코드스니펫 적용 후 에러가 발생하였습니다.
에러 문구상 firebase/compat/app을 못찾겠단 이야긴거 같은데...
어떻게 해결을 해야 하는지 모르겠습니다.
firebase 버전 문제 일수도 있다고 해서 강의내용 보고 재설치 완료 했습니다.
npm install도 해보았습니다.
스펠링 오류를 놓치고 있는가 싶어서 가능한 많은 캡쳐와 코드 올려 놓았습니다.
막바지에 몰아서 하느라 강의 완주를 위해 재촉아닌 재촉을드리게 되어 죄송합니다.
잘 부탁 드립니다.
//모바일 에러화면 캡쳐
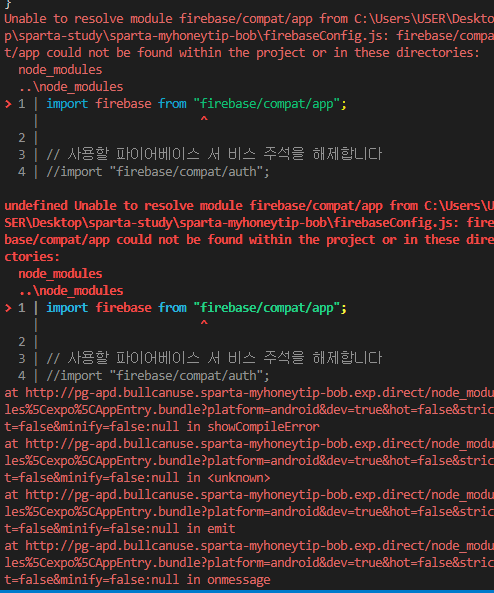
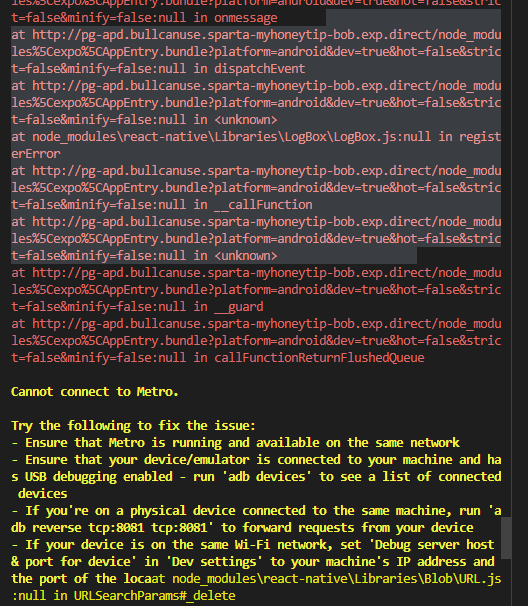
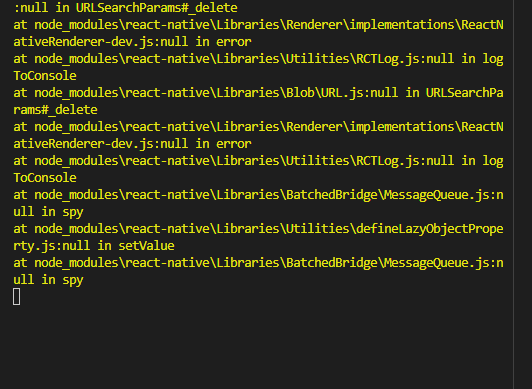
//터미널 내 에러 메세지
//EXPLORER
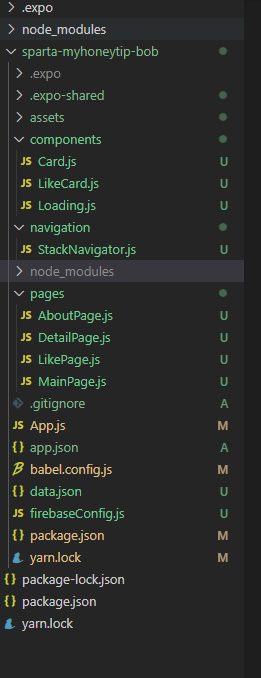
//터미널 내 에러메세지
Unable to resolve module firebase/compat/app from C:\Users\USER\Desktop\sparta-study\sparta-myhoneytip-bob\firebaseConfig.js: firebase/compat/app could not be found within the project or in these directories:
node_modules
..\node_modules
> 1 | import firebase from "firebase/compat/app";
| ^
2 |
3 | // 사용할 파이어베이스 서 비스 주석을 해제합니다
4 | //import "firebase/compat/auth";
undefined Unable to resolve module firebase/compat/app from C:\Users\USER\Desktop\sparta-study\sparta-myhoneytip-bob\firebaseConfig.js: firebase/compat/app could not be found within the project or in these directories:
node_modules
..\node_modules
> 1 | import firebase from "firebase/compat/app";
| ^
2 |
3 | // 사용할 파이어베이스 서 비스 주석을 해제합니다
4 | //import "firebase/compat/auth";
at http://pg-apd.bullcanuse.sparta-myhoneytip-bob.exp.direct/node_modules%5Cexpo%5CAppEntry.bundle?platform=android&dev=true&hot=false&strict=false&minify=false:null in showCompileError
at http://pg-apd.bullcanuse.sparta-myhoneytip-bob.exp.direct/node_modules%5Cexpo%5CAppEntry.bundle?platform=android&dev=true&hot=false&strict=false&minify=false:null in dispatchEvent
at node_modules\react-native\Libraries\LogBox\LogBox.js:null in registerError
at http://pg-apd.bullcanuse.sparta-myhoneytip-bob.exp.direct/node_modules%5Cexpo%5CAppEntry.bundle?platform=android&dev=true&hot=false&strict=false&minify=false:null in __callFunction
at http://pg-apd.bullcanuse.sparta-myhoneytip-bob.exp.direct/node_modules%5Cexpo%5CAppEntry.bundle?platform=android&dev=true&hot=false&strict=false&minify=false:null in callFunctionReturnFlushedQueue
Cannot connect to Metro.
Try the following to fix the issue:
- Ensure that Metro is running and available on the same network
- Ensure that your device/emulator is connected to your machine and has USB debugging enabled - run 'adb devices' to see a list of connected devices
- If you're on a physical device connected to the same machine, run 'adb reverse tcp:8081 tcp:8081' to forward requests from your device
- If your device is on the same Wi-Fi network, set 'Debug server host & port for device' in 'Dev settings' to your machine's IP address and the port of the local dev server - e.g. 10.0.1.1:8081
URL: pg-apd.bullcanuse.sparta-myhoneytip-bob.exp.direct:80
Error: Software caused connection abort
at node_modules\axios\lib\defaults\index.js:null in stringifySafely
at http://pg-apd.bullcanuse.sparta-myhoneytip-bob.exp.direct/node_modules%5Cexpo%5CAppEntry.bundle?platform=android&dev=true&hot=false&strict=false&minify=false:null in setHMRUnavailableReason
at node_modules\metro-runtime\src\modules\HMRClient.js:null in enable
at node_modules\react-native\Libraries\Core\setUpReactDevTools.js:null in isAppActive
at node_modules\metro-runtime\src\modules\vendor\eventemitter3.js:null in removeListener
at node_modules\react-native\Libraries\Utilities\createPerformanceLogger.js:null in PerformanceLogger#stopTimespan
at node_modules\react-native\Libraries\Blob\URL.js:null in URLSearchParams#_delete
at node_modules\react-native\Libraries\Renderer\implementations\ReactNativeRenderer-dev.js:null in error
at node_modules\react-native\Libraries\Utilities\RCTLog.js:null in logToConsole
at node_modules\react-native\Libraries\BatchedBridge\MessageQueue.js:null in spy
at node_modules\react-native\Libraries\Utilities\defineLazyObjectProperty.js:null in setValue
at node_modules\react-native\Libraries\BatchedBridge\MessageQueue.js:null in spy
//MainPage.js
import React,{useState,useEffect} from 'react';
import { StyleSheet, Text, View, Image, TouchableOpacity, ScrollView} from 'react-native';


const main = 'https://storage.googleapis.com/sparta-image.appspot.com/lecture/main.png'
import data from '../data.json';
import Card from '../components/Card';
import Loading from '../components/Loading';
import { StatusBar } from 'expo-status-bar';
import * as Location from "expo-location";
import axios from "axios"
import {firebase_db} from "../firebaseConfig"


export default function MainPage({navigation,route}) {
  //useState 사용법
  //[state,setState] 에서 state는 이 컴포넌트에서 관리될 상태 데이터를 담고 있는 변수
  //setState는 state를 변경시킬때 사용해야하는 함수


  //모두 다 useState가 선물해줌
  //useState()안에 전달되는 값은 state 초기값
  const [state,setState] = useState([])
  const [cateState,setCateState] = useState([])
  //날씨 데이터 상태관리 상태 생성!
  const [weather, setWeather] = useState({
    temp : 0,
    condition : ''
  })


  //하단의 return 문이 실행되어 화면이 그려진다음 실행되는 useEffect 함수
  //내부에서 data.json으로 부터 가져온 데이터를 state 상태에 담고 있음
  const [ready,setReady] = useState(true)


  useEffect(()=>{
    navigation.setOptions({
      title:'나만의 꿀팁'
    })
    //뒤의 1000 숫자는 1초를 뜻함
    //1초 뒤에 실행되는 코드들이 담겨 있는 함수
    setTimeout(()=>{
        firebase_db.ref('/tip').once('value').then((snapshot) => {
          console.log("파이어베이스에서 데이터 가져왔습니다!!")
          let tip = snapshot.val();

          setState(tip)
          setCateState(tip)
          getLocation()
          setReady(false)
        });
        // getLocation()
        // setState(data.tip)
        // setCateState(data.tip)
        // setReady(false)
    },1000)


  },[])


  const getLocation = async () => {
    //수많은 로직중에 에러가 발생하면
    //해당 에러를 포착하여 로직을 멈추고,에러를 해결하기 위한 catch 영역 로직이 실행
    try {
      //자바스크립트 함수의 실행순서를 고정하기 위해 쓰는 async,await
      await Location.requestForegroundPermissionsAsync();
      const locationData= await Location.getCurrentPositionAsync();
      console.log(locationData)
      console.log(locationData['coords']['latitude'])
      console.log(locationData['coords']['longitude'])
      const latitude = locationData['coords']['latitude']
      const longitude = locationData['coords']['longitude']
      const API_KEY = "cfc258c75e1da2149c33daffd07a911d";
      const result = await axios.get(
        `http://api.openweathermap.org/data/2.5/weather?lat=${latitude}&lon=${longitude}&appid=${API_KEY}&units=metric`
      );


      console.log(result)
      const temp = result.data.main.temp;
      const condition = result.data.weather[0].main

      console.log(temp)
      console.log(condition)


      //오랜만에 복습해보는 객체 리터럴 방식으로 딕셔너리 구성하기!!
      //잘 기억이 안난다면 1주차 강의 6-5를 다시 복습해보세요!
      setWeather({
        temp,condition
      })


    } catch (error) {
      //혹시나 위치를 못가져올 경우를 대비해서, 안내를 준비합니다
      Alert.alert("위치를 찾을 수가 없습니다.", "앱을 껏다 켜볼까요?");
    }
  }


  const category = (cate) => {
    if(cate == "전체보기"){
        //전체보기면 원래 꿀팁 데이터를 담고 있는 상태값으로 다시 초기화
        setCateState(state)
    }else{
        setCateState(state.filter((d)=>{
            return d.category == cate
        }))
    }
}


  //data.json 데이터는 state에 담기므로 상태에서 꺼내옴
  // let tip = state.tip;
  let todayWeather = 10 + 17;
  let todayCondition = "흐림"
  //return 구문 밖에서는 슬래시 두개 방식으로 주석
  return ready ? <Loading/> :  (
    /*
      return 구문 안에서는 {슬래시 + * 방식으로 주석
    */


    <ScrollView style={styles.container}>
      <StatusBar style="light" />
      {/* <Text style={styles.title}>나만의 꿀팁</Text> */}
      <Text style={styles.weather}>오늘의 날씨: {weather.temp + '°C   ' + weather.condition} </Text>
       <TouchableOpacity style={styles.aboutButton} onPress={()=>{navigation.navigate('AboutPage')}}>
          <Text style={styles.aboutButtonText}>소개 페이지</Text>
        </TouchableOpacity>
      <Image style={styles.mainImage} source={{uri:main}}/>
      <ScrollView style={styles.middleContainer} horizontal indicatorStyle={"white"}>
      <TouchableOpacity style={styles.middleButtonAll} onPress={()=>{category('전체보기')}}><Text style={styles.middleButtonTextAll}>전체보기</Text></TouchableOpacity>
        <TouchableOpacity style={styles.middleButton01} onPress={()=>{category('생활')}}><Text style={styles.middleButtonText}>생활</Text></TouchableOpacity>
        <TouchableOpacity style={styles.middleButton02} onPress={()=>{category('재테크')}}><Text style={styles.middleButtonText}>재테크</Text></TouchableOpacity>
        <TouchableOpacity style={styles.middleButton03} onPress={()=>{category('반려견')}}><Text style={styles.middleButtonText}>반려견</Text></TouchableOpacity>
        <TouchableOpacity style={styles.middleButton04} onPress={()=>{navigation.navigate('LikePage')}}><Text style={styles.middleButtonText}>꿀팁 찜</Text></TouchableOpacity>
      </ScrollView>
      <View style={styles.cardContainer}>
         {/* 하나의 카드 영역을 나타내는 View */}
         {
          cateState.map((content,i)=>{
            return (<Card content={content} key={i} navigation={navigation}/>)
          })
        }

      </View>

    </ScrollView>)
}


const styles = StyleSheet.create({
  container: {
    //앱의 배경 색
    backgroundColor: '#fff',
  },
  title: {
    //폰트 사이즈
    fontSize: 20,
    //폰트 두께
    fontWeight: '700',
    //위 공간으로 부터 이격
    marginTop:50,
    //왼쪽 공간으로 부터 이격
    marginLeft:20
  },
weather:{
    alignSelf:"flex-end",
    paddingRight:20
  },
  mainImage: {
    //컨텐츠의 넓이 값
    width:'90%',
    //컨텐츠의 높이 값
    height:200,
    //컨텐츠의 모서리 구부리기
    borderRadius:10,
    marginTop:20,
    //컨텐츠 자체가 앱에서 어떤 곳에 위치시킬지 결정(정렬기능)
    //각 속성의 값들은 공식문서에 고대로~ 나와 있음
    alignSelf:"center"
  },
  middleContainer:{
    marginTop:20,
    marginLeft:10,
    height:60
  },
  middleButtonAll: {
    width:100,
    height:50,
    padding:15,
    backgroundColor:"#20b2aa",
    borderColor:"deeppink",
    borderRadius:15,
    margin:7
  },
  middleButton01: {
    width:100,
    height:50,
    padding:15,
    backgroundColor:"#fdc453",
    borderColor:"deeppink",
    borderRadius:15,
    margin:7
  },
  middleButton02: {
    width:100,
    height:50,
    padding:15,
    backgroundColor:"#fe8d6f",
    borderRadius:15,
    margin:7
  },
  middleButton03: {
    width:100,
    height:50,
    padding:15,
    backgroundColor:"#9adbc5",
    borderRadius:15,
    margin:7
  },
  middleButton04: {
    width:100,
    height:50,
    padding:15,
    backgroundColor:"#f886a8",
    borderRadius:15,
    margin:7
  },
  middleButtonText: {
    color:"#fff",
    fontWeight:"700",
    //텍스트의 현재 위치에서의 정렬
    textAlign:"center"
  },
  middleButtonTextAll: {
    color:"#fff",
    fontWeight:"700",
    //텍스트의 현재 위치에서의 정렬
    textAlign:"center"
  },
  cardContainer: {
    marginTop:10,
    marginLeft:10
  },
  aboutButton: {
    backgroundColor:"pink",
    width:100,
    height:40,
    borderRadius:10,
    alignSelf:"flex-end",
    marginRight:20,
    marginTop:10
  },
  aboutButtonText: {
    color:"#fff",
    textAlign:"center",
    marginTop:10
  }


});
//firebaseConfig.js
import firebase from "firebase/compat/app";


// 사용할 파이어베이스 서비스 주석을 해제합니다
//import "firebase/compat/auth";
import "firebase/compat/database";
//import "firebase/compat/firestore";
//import "firebase/compat/functions";
import "firebase/compat/storage";


// Initialize Firebase
//파이어베이스 사이트에서 봤던 연결정보를 여기에 가져옵니다
const firebaseConfig = {
    apiKey: "AIzaSyAn2LmgM-k8MBfuvb4OuBRS8gMrCEaePpI",
    authDomain: "sparta-myhoneytip-bob.firebaseapp.com",
    databaseURL:"https://sparta-myhoneytip-bob-default-rtdb.asia-southeast1.firebasedatabase.app/",
    projectId: "sparta-myhoneytip-bob",
    storageBucket: "sparta-myhoneytip-bob.appspot.com",
    messagingSenderId: "685266700561",
    appId: "1:685266700561:web:ff29cc486b23b773c664b0",
    measurementId: "G-9RYW3WV0S3"
  };


//사용 방법입니다.
//파이어베이스 연결에 혹시 오류가 있을 경우를 대비한 코드로 알아두면 됩니다.
if (!firebase.apps.length) {
    firebase.initializeApp(firebaseConfig);
}


export const firebase_db = firebase.database()
//package.json
{
  "name": "sparta-myhoneytip-bob",
  "version": "1.0.0",
  "main": "node_modules/expo/AppEntry.js",
  "scripts": {
    "start": "expo start",
    "android": "expo start --android",
    "ios": "expo start --ios",
    "web": "expo start --web",
    "eject": "expo eject"
  },
  "dependencies": {
    "@react-native-community/masked-view": "^0.1.11",
    "@react-navigation/native": "^6.0.11",
    "@react-navigation/stack": "^6.2.2",
    "axios": "^0.27.2",
    "expo": "~45.0.0",
    "expo-application": "~4.1.0",
    "expo-linking": "~3.1.0",
    "expo-location": "~14.2.2",
    "expo-status-bar": "~1.3.0",
    "firebase": "^9.9.1",
    "react": "17.0.2",
    "react-dom": "17.0.2",
    "react-native": "0.68.2",
    "react-native-gesture-handler": "~2.2.1",
    "react-native-reanimated": "~2.8.0",
    "react-native-safe-area-context": "4.2.4",
    "react-native-screens": "~3.11.1",
    "react-native-web": "0.17.7"
  },
  "devDependencies": {
    "@babel/core": "^7.12.9"
  },
  "private": true
}


