


데이터베이스에서 데이터 가져왔습니다!! 까지는 잘 되는데요.
setState에 문제가 있다고 나옵니다.
팁찜하기 까지는 되는것 같은데 꿀팁찜을 누르는 순간 오류가 나고 아무것도 보이지 않습니다.
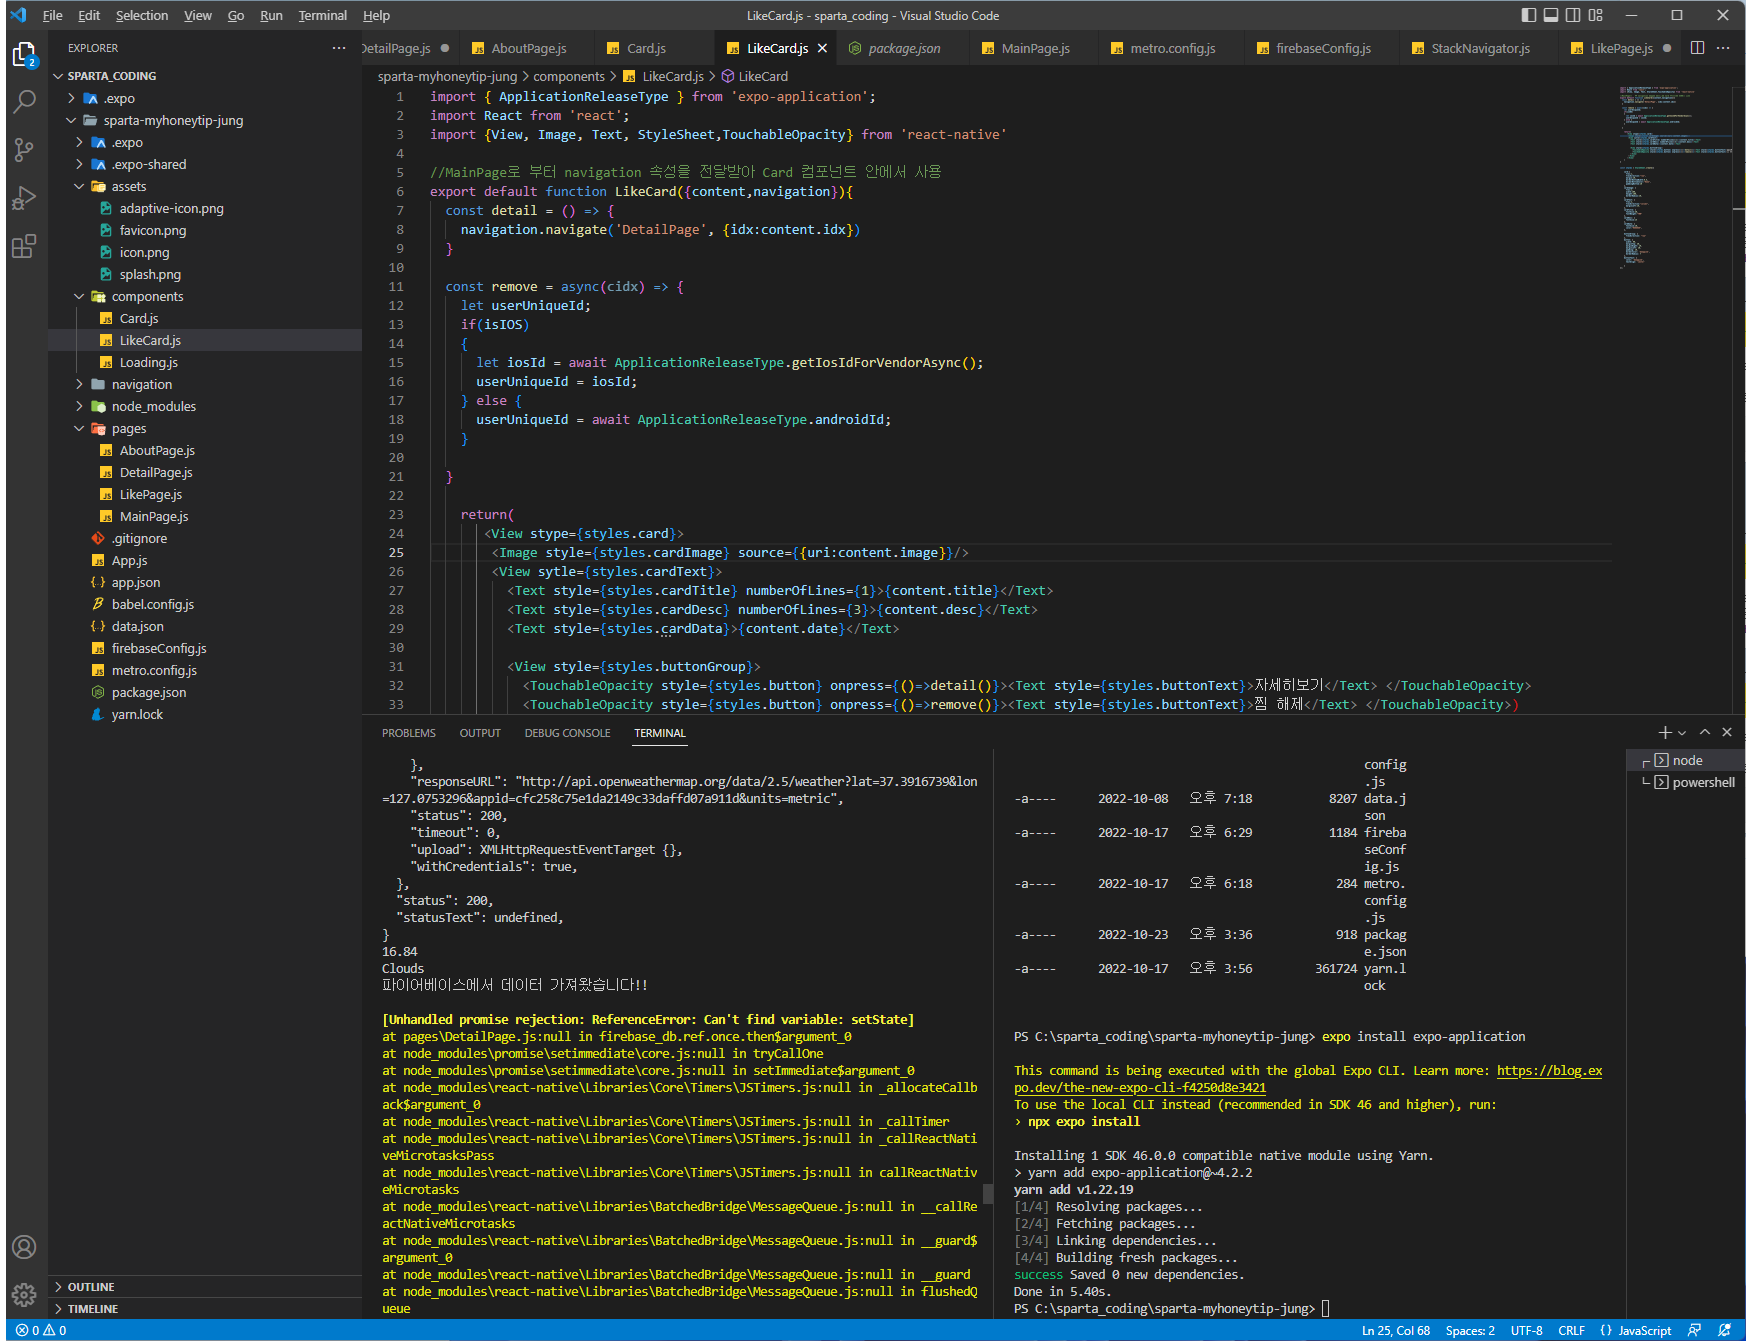
작성한 코드 및 에러 메세지
MainPage.js
import React,{useState,useEffect} from 'react';
import { StyleSheet, Text, View, Image, TouchableOpacity, ScrollView} from 'react-native';
const main = 'https://storage.googleapis.com/sparta-image.appspot.com/lecture/main.png'
import data from '../data.json';
import Card from '../components/Card';
import Loading from '../components/Loading';
import { StatusBar } from 'expo-status-bar';
import * as Location from "expo-location";
import axios from "axios"
import {firebase_db} from "../firebaseConfig"
export default function MainPage({navigation,route}) {
//useState 사용법
//[state,setState] 에서 state는 이 컴포넌트에서 관리될 상태 데이터를 담고 있는 변수
//setState는 state를 변경시킬때 사용해야하는 함수
//모두 다 useState가 선물해줌
//useState()안에 전달되는 값은 state 초기값
const [state,setState] = useState([])
const [cateState,setCateState] = useState([])
//날씨 데이터 상태관리 상태 생성!
const [weather, setWeather] = useState({
temp : 0,
condition : ''
})
//하단의 return 문이 실행되어 화면이 그려진다음 실행되는 useEffect 함수
//내부에서 data.json으로 부터 가져온 데이터를 state 상태에 담고 있음
const [ready,setReady] = useState(true)
useEffect(()=>{
navigation.setOptions({
title:'나만의 꿀팁'
})
//뒤의 1000 숫자는 1초를 뜻함
//1초 뒤에 실행되는 코드들이 담겨 있는 함수
setTimeout(()=>{
firebase_db.ref('/tip').once('value').then((snapshot) => {
console.log("파이어베이스에서 데이터 가져왔습니다!!")
let tip = snapshot.val();
setState(tip)
setCateState(tip)
getLocation()
setReady(false)
});
// getLocation()
// setState(data.tip)
// setCateState(data.tip)
// setReady(false)
},1000)
},[])
const getLocation = async () => {
//수많은 로직중에 에러가 발생하면
//해당 에러를 포착하여 로직을 멈추고,에러를 해결하기 위한 catch 영역 로직이 실행
try {
//자바스크립트 함수의 실행순서를 고정하기 위해 쓰는 async,await
await Location.requestForegroundPermissionsAsync();
const locationData= await Location.getCurrentPositionAsync();
console.log(locationData)
console.log(locationData['coords']['latitude'])
console.log(locationData['coords']['longitude'])
const latitude = locationData['coords']['latitude']
const longitude = locationData['coords']['longitude']
const API_KEY = "cfc258c75e1da2149c33daffd07a911d";
const result = await axios.get(
`http://api.openweathermap.org/data/2.5/weather?lat=${latitude}&lon=${longitude}&appid=${API_KEY}&units=metric`
);
console.log(result)
const temp = result.data.main.temp;
const condition = result.data.weather[0].main
console.log(temp)
console.log(condition)
//오랜만에 복습해보는 객체 리터럴 방식으로 딕셔너리 구성하기!!
//잘 기억이 안난다면 1주차 강의 6-5를 다시 복습해보세요!
setWeather({
temp,condition
})
} catch (error) {
//혹시나 위치를 못가져올 경우를 대비해서, 안내를 준비합니다
Alert.alert("위치를 찾을 수가 없습니다.", "앱을 껏다 켜볼까요?");
}
}
const category = (cate) => {
if(cate == "전체보기"){
//전체보기면 원래 꿀팁 데이터를 담고 있는 상태값으로 다시 초기화
setCateState(state)
}else{
setCateState(state.filter((d)=>{
return d.category == cate
}))
}
}
//data.json 데이터는 state에 담기므로 상태에서 꺼내옴
// let tip = state.tip;
let todayWeather = 10 + 17;
let todayCondition = "흐림"
//return 구문 밖에서는 슬래시 두개 방식으로 주석
return ready ? <Loading/> : (
/*
return 구문 안에서는 {슬래시 + * 방식으로 주석
*/
<ScrollView style={styles.container}>
<StatusBar style="light" />
{/* <Text style={styles.title}>나만의 꿀팁</Text> */}
<Text style={styles.weather}>오늘의 날씨: {weather.temp + '°C ' + weather.condition} </Text>
<TouchableOpacity style={styles.aboutButton} onPress={()=>{navigation.navigate('AboutPage')}}>
<Text style={styles.aboutButtonText}>소개 페이지</Text>
</TouchableOpacity>
<Image style={styles.mainImage} source={{uri:main}}/>
<ScrollView style={styles.middleContainer} horizontal indicatorStyle={"white"}>
<TouchableOpacity style={styles.middleButtonAll} onPress={()=>{category('전체보기')}}><Text style={styles.middleButtonTextAll}>전체보기</Text></TouchableOpacity>
<TouchableOpacity style={styles.middleButton01} onPress={()=>{category('생활')}}><Text style={styles.middleButtonText}>생활</Text></TouchableOpacity>
<TouchableOpacity style={styles.middleButton02} onPress={()=>{category('재테크')}}><Text style={styles.middleButtonText}>재테크</Text></TouchableOpacity>
<TouchableOpacity style={styles.middleButton03} onPress={()=>{category('반려견')}}><Text style={styles.middleButtonText}>반려견</Text></TouchableOpacity>
<TouchableOpacity style={styles.middleButton04} onPress={()=>{navigation.navigate('LikePage')}}><Text style={styles.middleButtonText}>꿀팁 찜</Text></TouchableOpacity>
</ScrollView>
<View style={styles.cardContainer}>
{/* 하나의 카드 영역을 나타내는 View */}
{
cateState.map((content,i)=>{
return (<Card content={content} key={i} navigation={navigation}/>)
})
}
</View>
</ScrollView>)
}
const styles = StyleSheet.create({
container: {
//앱의 배경 색
backgroundColor: '#fff',
},
title: {
//폰트 사이즈
fontSize: 20,
//폰트 두께
fontWeight: '700',
//위 공간으로 부터 이격
marginTop:50,
//왼쪽 공간으로 부터 이격
marginLeft:20
},
weather:{
alignSelf:"flex-end",
paddingRight:20
},
mainImage: {
//컨텐츠의 넓이 값
width:'90%',
//컨텐츠의 높이 값
height:200,
//컨텐츠의 모서리 구부리기
borderRadius:10,
marginTop:20,
//컨텐츠 자체가 앱에서 어떤 곳에 위치시킬지 결정(정렬기능)
//각 속성의 값들은 공식문서에 고대로~ 나와 있음
alignSelf:"center"
},
middleContainer:{
marginTop:20,
marginLeft:10,
height:60
},
middleButtonAll: {
width:100,
height:50,
padding:15,
backgroundColor:"#20b2aa",
borderColor:"deeppink",
borderRadius:15,
margin:7
},
middleButton01: {
width:100,
height:50,
padding:15,
backgroundColor:"#fdc453",
borderColor:"deeppink",
borderRadius:15,
margin:7
},
middleButton02: {
width:100,
height:50,
padding:15,
backgroundColor:"#fe8d6f",
borderRadius:15,
margin:7
},
middleButton03: {
width:100,
height:50,
padding:15,
backgroundColor:"#9adbc5",
borderRadius:15,
margin:7
},
middleButton04: {
width:100,
height:50,
padding:15,
backgroundColor:"#f886a8",
borderRadius:15,
margin:7
},
middleButtonText: {
color:"#fff",
fontWeight:"700",
//텍스트의 현재 위치에서의 정렬
textAlign:"center"
},
middleButtonTextAll: {
color:"#fff",
fontWeight:"700",
//텍스트의 현재 위치에서의 정렬
textAlign:"center"
},
cardContainer: {
marginTop:10,
marginLeft:10
},
aboutButton: {
backgroundColor:"pink",
width:100,
height:40,
borderRadius:10,
alignSelf:"flex-end",
marginRight:20,
marginTop:10
},
aboutButtonText: {
color:"#fff",
textAlign:"center",
marginTop:10
}
});
DetailPage.js
import React,{useState,useEffect} from 'react';
import { StyleSheet, Text, View, Image, ScrollView,TouchableOpacity,Alert,Share } from 'react-native';
import * as Linking from 'expo-linking';
import {firebase_db} from "../firebaseConfig"
import * as Application from 'expo-application';
const isIOS = Platform.OS === 'ios';
export default function DetailPage({navigation,route}) {
const [tip, setTip] = useState({
"idx":9,
"category":"재테크",
"title":"렌탈 서비스 금액 비교해보기",
"image": "https://storage.googleapis.com/sparta-image.appspot.com/lecture/money1.png",
"desc":"요즘은 정수기, 공기 청정기, 자동차나 장난감 등 다양한 대여서비스가 활발합니다. 사는 것보다 경제적이라고 생각해 렌탈 서비스를 이용하는 분들이 늘어나고 있는데요. 다만, 이런 렌탈 서비스 이용이 하나둘 늘어나다 보면 그 금액은 겉잡을 수 없이 불어나게 됩니다. 특히, 렌탈 서비스는 빌려주는 물건의 관리비용까지 포함된 것이기에 생각만큼 저렴하지 않습니다. 직접 관리하며 사용할 수 있는 물건이 있는지 살펴보고, 렌탈 서비스 항목에서 제외해보세요. 렌탈 비용과 구매 비용, 관리 비용을 여러모로 비교해보고 고민해보는 것이 좋습니다. ",
"date":"2020.09.09"
})
const { idx } = route.params;
firebase_db.ref('/tip/'+idx).once('value').then((snapshot) => {
let tip = snapshot.val();
setTip(tip)
});
const like = async () => {
// like 방 안에
// 특정 사용자 방안에
// 특정 찜 데이터 아이디 방안에
// 특정 찜 데이터 몽땅 저장!
// 찜 데이터 방 > 사용자 방 > 어떤 찜인지 아이디
let userUniqueId;
if(isIOS){
let iosId = await Application.getIosIdForVendorAsync();
userUniqueId = iosId
}else{
userUniqueId = await Application.androidId
}
console.log(userUniqueId)
firebase_db.ref('/like/'+userUniqueId+'/'+ tip.idx).set(tip,function(error){
console.log(error)
Alert.alert("찜 완료!")
});
}
useEffect(()=>{
//헤더의 타이틀 변경
navigation.setOptions({
title:'나만의 꿀팁'
})
firebase_db.ref('/tip').once('value').then((snapshot) => {
console.log("파이어베이스에서 데이터 가져왔습니다!!")
let tip = snapshot.val();
setState(tip)
setCateState(tip)
getLocation()
setReady(false)
});
},[])
const share = () => {
Share.share({
message:`${tip.title} \n\n ${tip.desc} \n\n ${tip.image}`,
});
}
const link = () => {
Linking.openURL("https://spartacodingclub.kr")
}
return (
// ScrollView에서의 flex 숫자는 의미가 없습니다. 정확히 보여지는 화면을 몇등분 하지 않고
// 화면에 넣은 컨텐츠를 모두 보여주려 스크롤 기능이 존재하기 때문입니다.
// 여기선 내부의 컨텐츠들 영역을 결정짓기 위해서 height 값과 margin,padding 값을 적절히 잘 이용해야 합니다.
<ScrollView style={styles.container}>
<Image style={styles.image} source={{uri:tip.image}}/>
<View style={styles.textContainer}>
<Text style={styles.title}>{tip.title}</Text>
<Text style={styles.desc}>{tip.desc}</Text>
<View style={styles.buttonGroup}>
<TouchableOpacity style={styles.button} onPress={()=>like()}><Text style={styles.buttonText}>팁 찜하기</Text></TouchableOpacity>
<TouchableOpacity style={styles.button} onPress={()=>share()}><Text style={styles.buttonText}>팁 공유하기</Text></TouchableOpacity>
<TouchableOpacity style={styles.button} onPress={()=>link()}><Text style={styles.buttonText}>외부 링크</Text></TouchableOpacity>
</View>
</View>
</ScrollView>
)
}
const styles = StyleSheet.create({
container:{
backgroundColor:"#000"
},
image:{
height:400,
margin:10,
marginTop:40,
borderRadius:20
},
textContainer:{
padding:20,
justifyContent:'center',
alignItems:'center'
},
title: {
fontSize:20,
fontWeight:'700',
color:"#eee"
},
desc:{
marginTop:10,
color:"#eee"
},
buttonGroup: {
flexDirection:"row",
},
button:{
width:90,
marginTop:20,
marginRight:10,
marginLeft:10,
padding:10,
borderWidth:1,
borderColor:'deeppink',
borderRadius:7
},
buttonText:{
color:'#fff',
textAlign:'center'
}
})
LikeCard.js
import { ApplicationReleaseType } from 'expo-application';
import React from 'react';
import {View, Image, Text, StyleSheet,TouchableOpacity} from 'react-native'
//MainPage로 부터 navigation 속성을 전달받아 Card 컴포넌트 안에서 사용
export default function LikeCard({content,navigation}){
const detail = () => {
navigation.navigate('DetailPage', {idx:content.idx})
}
const remove = async(cidx) => {
let userUniqueId;
if(isIOS)
{
let iosId = await ApplicationReleaseType.getIosIdForVendorAsync();
userUniqueId = iosId;
} else {
userUniqueId = await ApplicationReleaseType.androidId;
}
}
return(
<View stype={styles.card}>
<Image style={styles.cardImage} source={{uri:content.image}}/>
<View sytle={styles.cardText}>
<Text style={styles.cardTitle} numberOfLines={1}>{content.title}</Text>
<Text style={styles.cardDesc} numberOfLines={3}>{content.desc}</Text>
<Text style={styles.cardData}>{content.date}</Text>
<View style={styles.buttonGroup}>
<TouchableOpacity style={styles.button} onpress={()=>detail()}><Text style={styles.buttonText}>자세히보기</Text> </TouchableOpacity>
<TouchableOpacity style={styles.button} onpress={()=>remove()}><Text style={styles.buttonText}>찜 해제</Text> </TouchableOpacity>)
</View>
</View>
</View>
)
}
const styles = StyleSheet.create({
card:{
flex:1,
flexDirection:"row",
margin:10,
borderBottomWidth:0.5,
borderBottomColor:"#eee",
paddingBottom:10
},
cardImage: {
flex:1,
width:100,
height:100,
borderRadius:10,
},
cardText: {
flex:2,
flexDirection:"column",
marginLeft:10,
},
cardTitle: {
fontSize:20,
fontWeight:"700"
},
cardDesc: {
fontSize:15
},
cardDate: {
fontSize:10,
color:"#A6A6A6",
},
buttonGroup: {
flexDirection: "row"
},
button: {
width: 90,
marginTop: 20,
marginRight: 10,
marginLeft: 10,
padding: 10,
borderColor: 'deeppink',
borderRadius: 7
},
buttonText: {
color: 'deeppink',
textAlign: 'center'
}
});


